
Do you want to install and setup wordpress in cpanel in easiest way? this article is for you.
WordPress is the open-source CMS Platform developed in 2004 by the WordPress Foundation. Most of the blogging website has been designed using WordPress.
Not all the hosting providers are not providing cPanel. But most of budget hosting provider are providing cPanel as their hosting panel. so this article will guide you for setting up your website perfectly if you are using cPanel.
On the other case, most of the well known providers are providing Plesk panel or their customize panel for providing better user experience for their customer.
Table of contents
Setting up WordPress in cpanel [Step by step guide]
The important things about setting up the WordPress installation is the cpanel hosting. Choose the Correct hosting for you speed and responsiveness of the website which will provide better ranking of google.
After placing an order of a hosting account just log in to the hosting cPanel to create the installation file into the hosting location. Sometime the layout will not be the same all the hosting account.
P.S. Most of the cases you can access your hosting account by entering www.domainname.com/cpanel and enter your ID and password what you have received into your registered email.
WordPress installation guide: Important thing keep on you mind
After setting up and configured the hosting server, next step is to setting up the WordPress account using Softaculous is very essential and easy installation procedure.
- Create your Mail account in the hosting account to send and receive using business mail.
- Install SSL certificate if your hosting provider is not providing.
- Ensure your hosting provider provides the Softaculous for software installation.
Start installing WordPress on Hosting Server:
Login to the Hosting cPanel:
Login to your hosting account from the Client Area of the Website. Or can log in via entering the URL like www.something.com/cpanel and enter the username and password which is provided to your mailing account from your hosting provider.
If you can’t log in to your hosting account, contact with your hosting provider to check whether all the things are working well.
Create mail account:
This is the second step of installing WordPress on a hosting server. An email account is very much important for running any business or brand.
A brand Email id provides better credibility and trustworthy to their client. So, After log in to cPanel, find the email accounts section in the cPanel and create the email account.
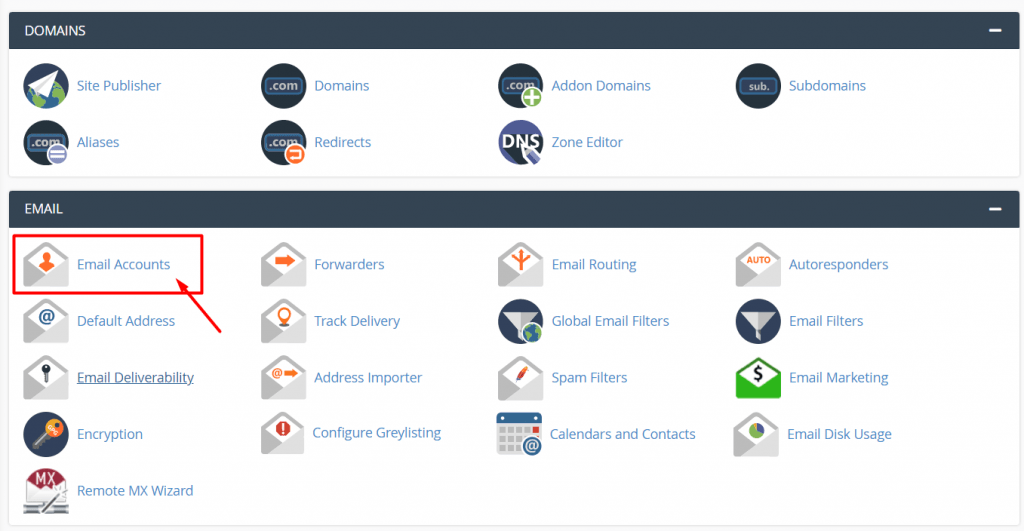
Now Create your new account follows the below screen
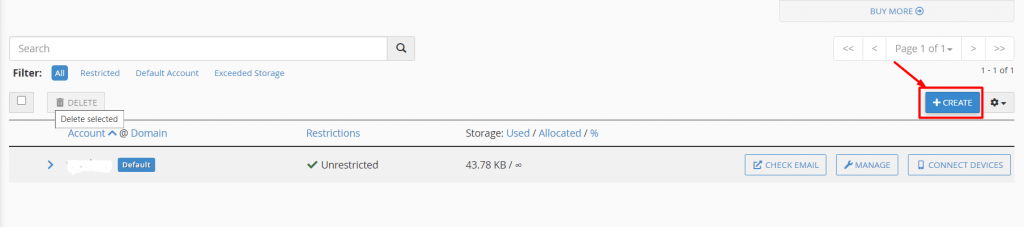
Now Enter your username like support, Contact, info and put your password and allocate space for your email account.

Install WordPress though the Softaculous
Now it is the time to install WordPress. We are using the Softaculous installer to install WordPress.


After hit the Install Now button another screen will display as per below. Now one thing you have remember before installing any WordPress in your hosting that leave directory as a “_blank_”. Otherwise, your website will be installed on the website domain folder. like “www.domain.com/wp“


Update the all details as per displaying form during the installation Process:
- Choose the version you want to install: Let it be Default and Always choose updated version for security
- Choose the installation URL: Select the https:// if you are using SSL Certificate or not. Let it be default. [Important Note: If you are not using SSL go with HTTP:]Even you can choose the https://www. All of the settings are depending upon your requirement. After that the URL and at the end of the box there is known for Directory selection like let’s see you are seeing WP that means the URL will be https://www.something.com/wp as a displayed URL. You Leave blank or delete the ‘WP’ to display the normal URL.
- Site Name: It displays the name of your Website.
- Site Description: It will tell what your website contents contain.
- Enable Multisite: Disable it for Beginning. The WPMU Website is completely another system. We will discuss the further article.
- Admin Username: Select your Username during login of your WordPress Installation
- Admin Password: Select the Password for login to your dashboard.
- Admin Email: Allows to use for password recovery and sending or receive any mails though the website.
- Language: Select your website Language.
- Select Plugin: Choose what plugin do you need? Now you can leave it Default for quick installation.
You can change as per your default name setup or otherwise leave it as it is. Now go for Install to complete the installation of WordPress.
Complete the WordPress Installation
Now after doing all the steps your website is live and you can change the website as per your requirement though the www.url.com/wp-admin and customize at your own choice.

We hope you will understand about the WordPress installation in the hosting server. this article for the WordPress beginner and if any question regarding the WordPress Installation, You can feel free to comment below.